Friday, June 10, 2011

Duct Tape Wallet

I have always wanted to make a duct tape wallet. So with graduation upon us I knew this graduate would appreciate receiving my creation. Especially if money was involved! I think this would fit his sense of style. He frequently wears different colored Converses, like one red and one black.
Before I watched or looked anything up online on how to make a duct tape wallet I knew I would need the tape. To Michaels I went. I was expecting a few assortment of colors, but I happily found that there were many colors to choose from as well as patterned duct tape - camo, stripes, etc. In addition, not only does it come in rolls, but in sheets, about 8" x 10". Perfect for your duct tape wallet making!
I watched this video to guide me along. She seemed to be pretty straight forward. I did make some of my own steps. I used my full sheets in places where she used strips. I didn't tape each card slot down on the sides, just the bottom AND then I did all the card slot sides together. Making little slits at the top edge sides so that there would have the flexibility.


I wanted to add my own special touch to the project. Using a random circular shaped wire, I cut out a square piece from the silver duct tape and carefully centered it in the middle of the wire, on the front of the wallet, using a blunt object ( I used a small crochet hook). I slowly "embossed" the tape down around the wire design. With a few presidents in there he should be happy.
Congratulations to the Class of 2011~


Wednesday, May 18, 2011

Sweet Baby Charlotte

I am glad to be back to Blogland and friends.  Much has happened since my last post, but I won't bore you with the drama-saga details.  :)  The most exciting thing that has happened to me during this interval - I became a grandma! Who knew that being a grandparent would be so exciting! Her name is Charlotte Francis and we met on January 28th.
Because of this and that, we knew scheduling my daughter's baby shower close to her due date that we could be in trouble and right we were! However I was able to make Charlotte an outfit to wear to the party.
WELCOME CHARLOTTE!!!

I used some material - Neapolitan  stripes and polka dot flannel- that was left over from covering her car seat. I will show how I did that in a future post.


Headband made from Neapolitan flannel with a vintage hankie flower and button center.

I added to a long sleeve white onesie a frilly accent with the striped and the polka dots and finished it off with 3 pink buttons.

For the skirt I used the Neapolitan striped fabric - I measured from her waist down to her knees, adding extra  for a casing for the elastic and a small hem. And I used a piece of scrap so that gave me the amount needed to go around. Before sewing the casing -  I cut a vintage hankie in half diagonal and placed it front as a faux apron.
The booties are may fave! I found the pattern here at - HELLOmynameisHeather - I came across this pattern back in '06 probably thinking I would make some for my son. Haha. Because she was such a newborn I resized it on my all-in-one printer until I got the perfect size. Here I used the Neapolitan polka dots on the outside and the stripes on the inside and bottom. And finished them off with a pink button
Introducing Miss Charlotte......

And here she is in her matching car seat....

I am so glad to be back. And I look forward to hearing from anyone who happens to drop by. When you leave a comment  let me know about your blog and I will be happy to take a browse in your neck of the woods.
Grammy

Thursday, March 25, 2010

Budding Pin Cushions

Here is another little project that I have been working on  
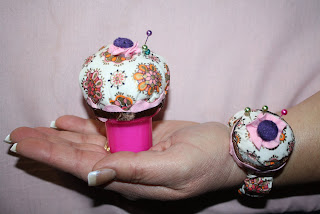
- a pincushion and a matching wrist pin cushion.
"Sweet Cupcake"
"Blue Bachelor Button"
"Miss Daisy"


The Collection

These darling little necessities of sewing are made recycling the tops of laundry detergent bottles to make the pin cushion.  For the wrist pin cushion, caps from juice bottles were used.  I used some small scraps of vintage material for "Sweet Cupcake" and the others were from my scrap collection.  Adorned with lace, ribbon, covered buttons and rick-rack.  
General Directions ~
Cut out a circle about an inch larger than your lid. I used my pinking shears.
Stuff your lid really well with polyfil.
With a hot glue - Glue a tiny section at a time - using a compass method - glue a spot at "North" - then at "South", "East" and "West" to the outside of the lid.  Then go back around and glue the other "points" down. Make sure the fabric is taut over the polyfil.
For the wrist pincushion- measure about 7 1/2" in 1" elastic. 
Cut a length of fabric about 14" long and 2" wide - fold in half right sides together, lengthwise - stitch the long side - turn. Insert elastic through. Overlap the ends about 1/2" and stitch together with a zig-zag stitch.  Use hot glue to attach it to the bottom of the small juice lid.
Now both pin cushions are ready to adorn with with lace, ribbon, charms, rick-rack, buttons, beads, fringe, etc.  
Have Fun!
The pin cushions posted here are for sale ~ 
email me at rfthreads@yahoo.com to purchase.