This is what I did - *note - it is hard for me to NOT to evolve my designs, so you will notice throughout that there will be different colors used for the same element and different placement
I made each element of the card first so that I could do an assembly line construction to make it somewhat easier.
With white card stock paper using sentiments from Close to My Heart (CTMH) stamps "Peace On Earth" and the CTMH Tulip stamp pad stamp out the "Christmas" one each for card making ....
....then cut each word out..... and with the Christmas word gently slide the edges along the stamp pad to add color to the edge. This will make the "Christmas" *pop* from the card.
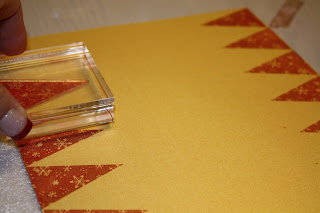
For my design I wanted to put the letters of JOY in a banner - so I used CTMH stamp set "Evergreen" which happens to be triangle Christmas trees and using the snowflake tree I stamped out rows and rows of now pennant using CTMH Creme Brulee and Tulip on a shimmering gold card stock paper.
NEED 3 TRIANGLES FOR EACH CARD

Then using the Fisker paper cutter, cut strips - lining up so that the cut is at the tips of the triangles.

With the Creative Memories paper trimmer it makes it easier to slice out each triangle

Because I was making so many cards, I stamped on the triangles that were left after cutting the stamped triangles.
For the letters of J-O-Y
I used CTMH "Delightful Alphabet" stamp set - using Tulip on the Creme Brulee pennants and black on Tulip pennants

Stamp the J and O and Y on each pennant times the number of cards making

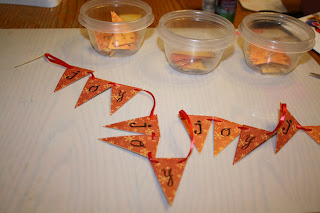
I sorted them into little cups to keep them organized...

Using The Crop-o-Dial and the smallest eyelet hole making -
punch a hole in each point at the shortest end of the triangle
I punched several at a time.
Then recruit your spouse and child to cut 8 1/2 " x 10" white or other colored card stock, in this case - pink and red were used too - in half -horizontal
Using the same recruits have them cut out 4 1/2" x 5" rectangles from patterned Christmas paper - used here are CTMH "Jingle" paper- which is printed on both sides which gives it more use.
While the recruits are busy with their jobs -
using a strand of thin red or yellow ribbon and a large eyed needle threads some J-O-Y lettered pennants - start with the Y and so forth - repeat for as many as cards you are doing.
After stringing up some JOY - cut a section of ribbon that would fit on the card- this is where personal preference happens - the banner can be laid as pictured with the pennants close together and the ribbon all the way across and the ends of the ribbon will be tucked behind the patterned paper when it is adhered to the card. Other suggestions could be - the banner placed with a curve with ribbon ends tucked,
the banner at a curve or straight but the ribbons cut short at an angle and stay on the front of card,
or the ribbon ends could have a button to cover them....
After adhering the JOY banner place the "Christmas" word element either above or below the banner.
Adhere the embellished patterned paper to the card front so that it is a top fold.
I used a green stamp pad to stamp the inside sentiment:
"THE VERY WORD BRINGS JOY TO OUR HEARTS"
Then use glitter glue and highlight or add dots, squiggles or lines to the front of the cards.
The back two cards are made using the same printed paper just different sides - as well as the front set.
This is a small sampling of how different my cards became.
This is a small sampling of how different my cards became.
This is a 45 Card Standing Ovation
That was it. I do hope you have enjoyed it. I would love to see the cards you made or even ones you have received - leave me a link in the comment box and I will check them out! Merry Christmas!


