


I've always wanted to make a T-Shirt blanket of sorts.
My second oldest daughter really likes Tinker Bell and over the years has had many t-shirts with this tinker fairy on them. Over the years as the t-shirts became too small I would remove them from her and save them. I even gathered some from Ruth's Room, yard sales and thrift stores. With the Christmas Season coming upon us, I knew it would make a great gift for my daughter. Then it went even further, that I made one for each of my sons. I had to take t-shirts from their dresser drawers to make their blankets big enough.
Step #1- Gather up t-shirts -
I used 27 t-shirts for the Tinker Bell throw and 26 t-shirts for oldest son and
33 t-shirts for youngest ( since most of his were size 2/3 t, more was needed )
Step #2 - Cutting Sides of T-Shirts -
This step could be used with a rotary cutter and mat or with scissors - I used scissors....
Fold the bottom of t-shirt to back of neck with the front of shirt showing
*NOTE* I made a smaller throw using nothing but 12 turtle neck shirts, since there was no design on the front of the turtle neck I was able to cut them all the same size. With a design on the front it is somewhat more difficult for the throw to be uniform*
I rarely like to measure so I eyed where to cut from bottom of fold to the top, cutting the side seams and sleeves off.

Step #3 - Cutting Ends -
Once the sides are cut off on each side - Keeping both thicknesses - fold the t-shirt in half the other way. Cut the bottom hem and neck seams off.


This what your t-shirt will then look like.

Step #4 - Repeat Steps 2 and 3

Step #5 - T-Shirt Block Placement
I did this on the floor as a table will not be big enough - Place each t-shirt block in columns, putting same size widths together, some personal preference of placement happens here. In one of my kids' I put all Lightening McQueen across the tops and all in one column and with the other two I mixed them up as much as I could. If a t-shirt is much larger than any of the others, trim it to fit.

In the above picture I have a gap between my columns and
I used a part of another t-shirt from my stash to fill it in.

Step #6 - Sewing A Column
It is easier to sew it in columns than in rows because the t-shirts are mostly the same width now. I took my column and stacked one t-shirt on top of the other in the order I wanted it to be and took it to my sewing machine.
With WRONG sides together and double thickness of each t-shirt, sew a 1" inch seam and repeat.
Step #7 - Sewing Columns Together
Once you have completed sewing each column, lay them out on the floor for final placement, making sure that the top and bottom is some what even. Then with WRONG sides together, sew each column together.
Step #8 - Sew a 1" Seam All the Way Around the Outside Edges
Step #9 - Clip Seams
To complete your t-shirt throw, clip the seams to give it a "ragged" appearance. With some sharp - tip scissors, cut just to the threads - DO NOT CUT THE THREADS - on every seam and all around the outer edges as well.

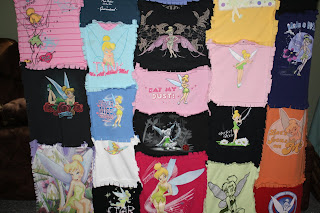
My daughter Evie's T-shirt Throw
My Son Daniel's T-Shirt Throw

Daniel with his T-shirt Throw are now inseparable.

My son Garrett's T-Shirt Throw

Garrett and his T-Shirt Throw

All Three T-shirt Throws


7 comments:
Great job! I like the colorful combinations and I can tell the kids love them.
measure, cut, sew, and show!
Great way to demonstrate your creativity,
excellent post.
http://en.wordpress.com/tag/jingle/
welcome.
I want to make one of these. But I have a question. When you double thickness of the each t-shirt did you fold them in half? or is there a shirt on the back too? Did you back it to make it a little warmer?
I have tons in the attic that I would love to do this with.
What a great and personnel gift idea. You did a great job, thanks for sharing
I love this.
I was going to do this with my sons old clothes. I never gotten around to doing it. I just gave his clothes away. I will have to save somemore.
I love the Cars Blanket!!!
Starla,
I love your blankets so much I linked to them here
http://quilting.craftgossip.com/tutorial-t-shirt-blanket-for-kids/2010/01/04/
Nice job on the blankets and the tutorial.
Cheers,
Scarlett Burroughs
Quilting Editor, Craft Gossip
I love this idea! I am currently working on two of these
For my twin girls. I will let you know how they turn out... Thanks
Post a Comment