Thursday, March 25, 2010

Budding Pin Cushions

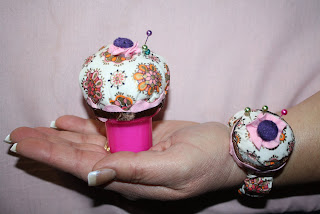
Here is another little project that I have been working on  
- a pincushion and a matching wrist pin cushion.
"Sweet Cupcake"
"Blue Bachelor Button"
"Miss Daisy"


The Collection

These darling little necessities of sewing are made recycling the tops of laundry detergent bottles to make the pin cushion.  For the wrist pin cushion, caps from juice bottles were used.  I used some small scraps of vintage material for "Sweet Cupcake" and the others were from my scrap collection.  Adorned with lace, ribbon, covered buttons and rick-rack.  
General Directions ~
Cut out a circle about an inch larger than your lid. I used my pinking shears.
Stuff your lid really well with polyfil.
With a hot glue - Glue a tiny section at a time - using a compass method - glue a spot at "North" - then at "South", "East" and "West" to the outside of the lid.  Then go back around and glue the other "points" down. Make sure the fabric is taut over the polyfil.
For the wrist pincushion- measure about 7 1/2" in 1" elastic. 
Cut a length of fabric about 14" long and 2" wide - fold in half right sides together, lengthwise - stitch the long side - turn. Insert elastic through. Overlap the ends about 1/2" and stitch together with a zig-zag stitch.  Use hot glue to attach it to the bottom of the small juice lid.
Now both pin cushions are ready to adorn with with lace, ribbon, charms, rick-rack, buttons, beads, fringe, etc.  
Have Fun!
The pin cushions posted here are for sale ~ 
email me at rfthreads@yahoo.com to purchase.

Friday, March 19, 2010

Semper fidelis

Semper fidelis is Latin for "Always Faithful" and it is the motto for the U.S. Marine Corps.  I had happened upon some Marine dress shirts, not knowing any thing personal about them, I decided to make an apron from them.  An apron in the wonderful magazine "Altered Couture"  (Feb, Mar, Apr 2010 edition page 17) a designer used men's dress shirts for an apron.  Actually the sleeves. This inspired me to make two aprons based off that idea. I took both long sleeves off of 2 shirts and a set of short sleeves off of one shirt.  The short sleeves became the pockets.  I had two neckties that I cut in half and used them for the apron ties.  A little yellow ribbon sewed on to show support for the troops.   Both aprons are for purchase - email me at rfthreads@yahoo.com if interested.

 You gotta love a Marine in uniform!


Thursday, March 11, 2010

Fashion Apron Making and Memories

Hello everyone! The fashion show is over and it was a success - more of that event coming soon.  Today, I just wanted to sew.  I have been wanting to make aprons from on-their-way-out skirts or dresses.  Working at Ruth's Room, I see lots of material in the ready-made garments that are out-of-date or may have a stain, or something else that would keep it from not being worn as a garment- so instead of tossing it in the trash we volunteers like to get creative and repurpose it. For example - This little girl's dress has a ink stain on the front by the flower - love the colors of the pattern and love the embellishment - lets turn it into an apron....
 A Basic Girl's Jumper Dress - this one was a size 8.
Dismantle the dress-  I cut around the zipper to remove it - and save it for future use - continuing cutting all the way down the back of dress. I cut the bodice from the skirt. Using something round for a guide, I rounded the corners of the back of dress, now the apron sides. 
 
Pocket -  I  placed the bodice as flat as possible and cut a eye-ball straight line from the edge of arm hole down to raw edge of bodice. I folded over a seam allowance straightening up the pocket as it was ironed. Using the neckline of bodice to become the opening of pocket - I sewed on red rick-rack, tucking the ends under the edge. Then place the pocket on the apron where you want it. I put this one slightly over the ribbon flower to cover up the stain. Pin down. I sewed the rick-rack and the pocket down together, tucking the rick-rack ends over the edge and miter the corners.  
 
Embellishments - At the corner of pocket I sewed on three fabric flowers made with some of the back bodice material with button centers on top of a small pink crocheted doily.
Hem- I folded over twice for a hem at the back and the rounded edge of apron hem.  I sewed on more red rick-rack on lower apron edge.
Waist band and Ties -  I used the rest of the back bodice sides to make the waist band. These two pieces were about three inches wide and about ten inches long. With a 1/4" seam I joined the two together and ironed in half length-wise. Then I attached the waist band to apron, matching centers and finishing the seam with a zig-zag stitch.  I ran out of material from the dress for the ties, so I purchased some red broadcloth.  I cut two 3" wide strips the whole length of the material. Fold in half and stitched. Turn right side out. Sewed it to the edge of waist band. I slowly top-stitched the lower and upper part of the waistband. Tie it on and Enjoy!
My darling daughter as my model.
With cute aprons like this one, we need to bring them back in style! Aprons are so amazing and hold a lot of memories for many. I remember Grandma cutting kindling for her wood cook stove to make pancakes for breakfast with Huckleberries in the batter - yum - wearing an apron.  What is your favorite memory....